Sutherlands Organic Solutions
“We are a lawn care company committed to helping your lawn look its best and our earth help itself.”
SOS March Lawn Care Tips: Snow Joke — It’s Time to Get Your Lawn Spring-Ready!
It’s hard to believe spring is almost here when everything outside still looks like a winter wonderland. But despite the lingering snow and chilly temperatures, warmer days are on the way.
As the snow begins to melt and your lawn slowly emerges from winter dormancy, it’s important to start thinking ahead. March is a key month for laying the groundwork for a lush, healthy lawn.
Below are a few early-spring lawn care tips to help you get started as the winter wonderland begins to fade and your lawn reappears.
While the Snow Is Melting (AKA The Great Thaw Begins!)
❄️Clean Up Winter Debris: As snow melts, remove fallen branches, leaves, and debris from your lawn. Clearing these away allows sunlight and air to reach the grass, helping prevent mold and disease.
❄️Watch for Snow Mold & Winter Damage: Monitor for gray, brownish, or pink patches caused by snow mold. Keeping the lawn free of snow piles and winter debris can help the grass recover more quickly as temperatures warm.
❄️ Avoid Heavy Foot Traffic: Grass will be fragile as it emerges from winter dormancy. Limiting foot traffic now helps prevent soil compaction and damage the emerging grass.
After the Snow Says Its Final Goodbye
🌿Refresh Your Lawn: Light cleaning helps remove lingering debris and spreading snow piles evenly on your lawn reduces the risk of snow mold and improves air circulation, allowing sunlight to reach new growth.
🌿Address Bare or Damaged Areas: If winter is left behind thin or bare spots, early spring is a good time to plan repairs. Proper preparation now helps grass fill in more evenly as the season progresses.
🌿Watch Soil Conditions: Avoid working on the lawn when the soil is overly wet. Walking or mowing on soggy ground can cause compaction and damage young grass roots.
🌿 Plan Early for Spring Services: Spring is our busiest time of year. Scheduling services early ensure your lawn receives timely treatments, such as fertilization and crabgrass prevention, when they matter most.
🌿 Start Thinking About Weeds: Many weeds begin growing before you see them. Early spring pre-emergent treatments are among the most effective ways to prevent weeds from taking over your lawn.
🌿 Crabgrass & Weed Prevention Timing: Early Spring is the ideal time to apply crabgrass prevention before crabgrass germinates. Please don’t delay service this spring; getting ahead of crabgrass early can save on frustration later in the season.
Spring will sneak up on us before we can even put the snow shovel away! 🌷🌞A little attention in early spring goes a long way toward a healthier lawn all season long. If you have questions about your lawn or would like to review your spring services, we’re happy to help.
Thank you for trusting us with your lawn care needs. We look forward to another great season ahead!

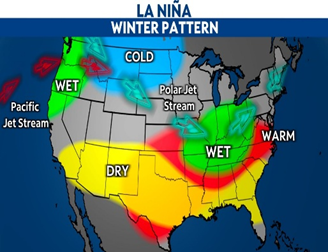
Spring Forecast Takes a Twist: What a Weakening La Niña Could Mean for Spring Weather
Here’s a snapshot of what forecasters are expecting for New England’s spring (March-May) this year — based on the latest seasonal outlooks and long-range predictions:
Key Highlights brought to you by The Weather Channel, Old Farmer’s Almanac, & Climate Prediction Center (CPC), Boston.com, AOL, AccuWeather, & Severe Weather Europe (SWE)
Temperature Trends:
- Above-average temperatures overall: Many forecasts — including long-range models and traditional outlooks like the Old Farmer’s Almanac — suggest warmer-than-normal conditions across much of New England as spring unfolds. (Boston.com)
- However, because La Niña is weakening and we’re transitioning toward neutral conditions, there’s more variability in how quickly the warmth arrives. Early spring (especially March) could still feel chilly at times before spring warmth becomes more consistent. (AOL)
Precipitation and Snow Melt:
- With the season shifting, expected precipitation patterns are closer to “normal” for spring — meaning rain showers and some unsettled wet days are likely as snow melts and the ground thaws. (CPC)
- There’s also a chance of late-season snow or frost early in spring before temperatures fully moderate. This is common in New England and can linger into March or even April in inland and northern areas. (AccuWeather)
Seasonal Patterns:
- Because La Niña’s influence is fading, spring weather may be driven more by local and regional weather patterns (like how the jet stream sets up and whether coastal or inland systems form) rather than a dominant ENSO phase. (SWE)
Neutral or transitioning conditions often bring mixes of cool spells, warm breaks, showers, and some storm systems — typical of classic New England springs. (CPC)
What It Means for You:
In practical terms, you can probably expect: (The Weather Channel, AccuWeather, & AOL)
- A slow but steady warming trend as spring progresses, with milder days becoming more common by April and May.
- Chilly starts early in the season, especially in March, with possible late frosts or even brief snow flurries before spring really kicks in.
- Rain and typical spring variability, including sunny, cool, wet, and breezy days mixed together as the season transitions.
Bottom line:
This spring in New England looks like it will trend somewhat warmer than average overall, but with a classic mix of spring weather — cool bursts early, gradual warming, and plenty of rain/showers as snow melts and the season shifts. (The Weather Channel)
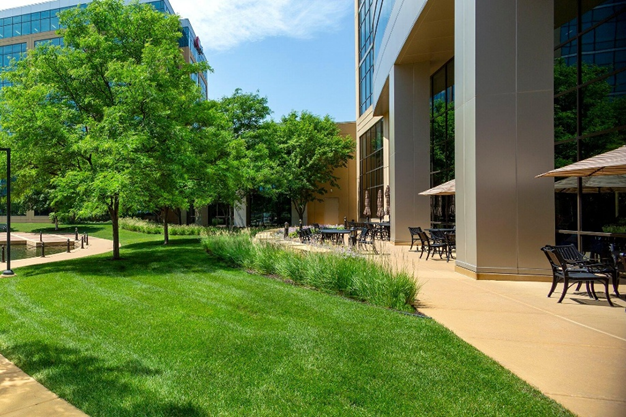
Your Business Deserves a Better Lawn – Professional Lawns for Professional Properties
Commercial lawn care is more than routine maintenance — it’s a strategic investment in your business’s success.
Proper turf care directly influences your company’s image, enhances safety, protects property value, and shapes the overall customer experience.
A well-maintained landscape sends a powerful message about professionalism and attention to detail, while also reducing risks and preserving the long-term value of your property.
1. First Impressions = More Business
Your landscape is often the first thing customers see before walking inside.
- A green, well-maintained lawn signals professionalism and success
- Clean turf creates a welcoming environment
- Poor lawn care (brown grass, weeds, trash) can make a business look neglected
For retail stores, office buildings, hotels, and restaurants, curb appeal can influence whether someone chooses to enter.
2. Protects Property Value
Regular turf maintenance:
- Prevents weed overgrowth
- Controls soil erosion
- Extends the life of landscaping investments
Well-maintained commercial properties typically maintain higher real estate value compared to neglected ones.
3. Safety & Liability Reduction
Poor turf maintenance can cause:
- Trip hazards from uneven growth
- Pest infestations
- Blocked sidewalks or visibility issues
- Mud and drainage problems
Proper lawn care reduces the risk of accidents and potential liability claims.
4. Employee Productivity & Morale Enhances
Studies show that green outdoor spaces:
- Reduce stress
- Improve mood
- Increase workplace satisfaction
Employees are more productive in environments that feel clean and cared for.
5. Environmental Benefits
Professional turf care:
- Improves air quality
- Reduces heat around buildings
- Helps with stormwater management
- Prevents soil erosion
This supports sustainability goals, which many commercial businesses now prioritize.
6. Brand Image & Reputation
Your landscaping reflects your brand:
- Luxury business → premium landscape
- Healthcare facility → clean, calm environment
- Corporate office → organized, polished appearance
Customers often associate the condition of the property with the quality of services inside.
In Short:
Commercial turf care is an investment in:
- Marketing
- Property protection
- Safety
- Customer perception
- Employee well-being
Commercial properties should love their lawn — because it’s out there working just as hard as the team inside.
It’s the first to greet customers, the first to make an impression, and the first to show the pride behind your business.
When your lawn looks sharp, your whole business shines — and that’s an investment that only keeps growing. 🌱
❄️ Snow Shoveling Safety Starts with You!! ❄️
The blizzard is rolling in… and it’s bringing the fluffy chaos! ❄️💨
Heavy snow looks beautiful — but shoveling it incorrectly can lead to serious injuries. Protect your back, heart, and muscles during this winter storm!
Before you channel your inner snow-warrior, remember:
🧤 Stretch it out: Warm up those arms, legs, and back for 5–10 minutes before heading outside. Cold muscles + heavy snow = not a good combo!
🧥 Layer up: Dress in warm, breathable layers so you stay cozy without overheating.
⏱️ Take breaks: Snow shoveling is serious cardio! Rest every 10–15 minutes and drink water — even if you don’t feel thirsty.
💪 Lift Smart- Lift with your legs, not your back: Bend your knees, keep your back straight, and avoid twisting while lifting. Lift small amounts at a time and hold the shovel close to your body. Helpful Tip: Pushing snow is easier and safer than lifting it.
⚠️ Watch for Ice: Wear boots with good traction to prevent slips and falls.
❤️ Most Important: Listen to your body: Know the warning signs! Stop immediately and seek help if you feel chest pain, shortness of breath, dizziness, or unusual fatigue.
Snow shoveling safety starts with YOU — let’s keep the only thing falling this week be snow! ❄️😉
Stay safe, stay warm, and shovel smart! 🏔️✨

🚨❄️ New England Blizzard Incoming… But Spring Is Closer Than You Think! ❄️🚨
New England is bracing for another classic winter blast — heavy snow, strong winds, and freezing temps. While everyone’s stocking up on salt and firing up the snowblowers, now is actually the perfect time to start thinking about your lawn.
Because here’s the truth:
🌱 The lawns that look best in May are planned for in February.
🌨️ Snow Today = Lawn Impact Tomorrow
All that snow doesn’t just disappear without consequences.
Long snow cover can lead to:
- Snow mold and fungal issues
- Compacted soil from heavy snow piles
- Salt damage near driveways and sidewalks
- Weak root systems heading into spring
By the time the snow melts, problems are already forming beneath the surface.
🌱 Why Plan Lawn Care Now?
Booking your spring lawn program early means:
✅ Priority scheduling once the ground thaws
✅ Early fertilization to jumpstart green-up
✅ Pre-emergent weed control before crabgrass takes hold
✅ A thicker, healthier lawn before summer heat hits
❄️ Don’t Let the Blizzard Fool You
Yes, there’s snow in the forecast……Yes, winter is still here…… But in just a few short weeks, the melt will begin — and the race to revive lawns will be on. The homeowners who prepare now are the ones enjoying lush, green yards while others are scrambling to fix bare patches and weeds.
🌷 Spring is coming — whether the blizzard likes it or not. Secure your lawn care plan today and be first in line when the thaw begins.
📞 Contact us now to reserve your spot and give your lawn the head start it deserves!
Call SOS 401-764-0740 or Email: info@soslawn.com